Tip Menjaga Komputer Riba


Komputer riba ataupun laptop/notebook/netbook merupakan satu keperluan bagi kita
sekarang sebab teknologi makin canggih harga pun makin murah. Amat mudah untuk
dapatkan komputer riba dengan spec yang tinggi tapi harga yang rendah sekarang.
Bila kita gunakan komputer riba, kita akan lebih mudah melayari internet, dengar lagu,
berchatting dan sebagainya. Tapi kita perlu tau cara untuk jaga komputer riba kita. Jom baca
tips penjagaan komputer riba kat bawah.

1. Bateri
Elakkan daripada penggunaan bateri. Komputer lebih sejuk tanpa haba dari bateri. Jika
bateri sudah habis dicas, digalakkan menggunakan kuasa dari adapter. Pastikan bateri berada
di bawah 10 peratus sebelum dicas semula. Jika terlalu kerap dicas, bateri akan kehilangan
keupayaan menyimpan tenaga di bawah 50 peratus.

2. Papan Kekunci.
Letakkan sekeping kertas A4 untuk papan kekunci setiap kali tidak menggunakannya
untuk menghindarkan papan kekunci dimasuki habuk. Sesekali lapkan papan kekunci dengan
perlahan-lahan. Jangan terlalu kasar untuk mengelakkan butang kekunci rosak. Kalau boleh
gunakan papan kekunci dan tetikus berasingan supaya kita tidak terlalu kerap menggunakan
papan kekunci di komputer riba.

3. Skrin LCD
Lapkan ia selalu kerana mudah dimasuki habuk. Gunakan screen saver. Power
management setkan pada Turn Off monitor in minutes. Elakkan menyentuh skrin dengan jari
kerana kesan jari yang berminyak menyukarkan untuk pembersihan. Jangan letakkan jari di
skrin kerana boleh menyebabkan Dead pixel.

4. Haba Panas
Pasikan komputer riba anda ada ruang untuk mengeluarkan haba panas. Perlu diingat
komputer riba mempunyai ruang simpanan yang kecil.

5. Surge Protector
Fungsinya sebagai menjaga perisian dan perkakasan daripada rosak. Disyorkan jenama
APC, BELKIN atau TARGUS. Kelebihan APC - mempunyai bateri simpanan, line protection
(tiada elektrik tapi masih boleh dihidupkan lagi) dan mempunyai amaran kehabisan bateri.
Kelebihan lain Surge Protector ialah menjaga HDD dan Power Supply.

6. Port
Sentiasa dibersihkan kerana mudah dimasuki habuk. Gunakan berus atau berus gigi lama.
Pastikan suis dimatikan ketika membuat pembersihan.
read more

Tutorial Photoshop CS3. Imej Api

Step 1
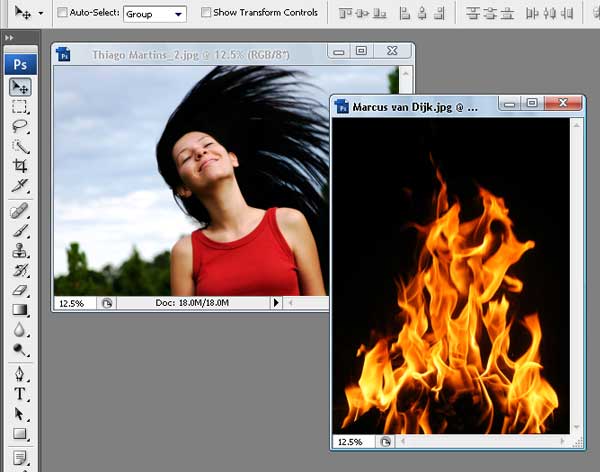
For this project, I used two nice images that suits for the manipulation; image1image2. I would like to thank the author of this two great pictures, which is thiquinho and huibidos from sxc.hu. And before we continue with the steps, I need to inform you that this tutorial is written using Photoshop CS3.

Step 2

Let’s start with 
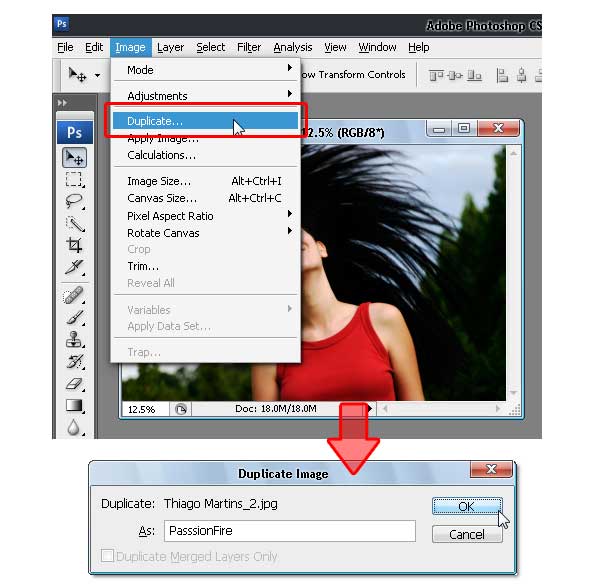
image1, open and duplicate this image by using the Image > Duplicate command from the menu bar. In the Duplicate Image dialog box, you can name it anything you like, but to follow this tutorial reference, name it "PassionFire" and hit OK. By doing this, we kept the original image. Be sure to save.

Step 3

With the "PassionFire" image active, duplicate the "background" layer. Set the foreground and background color to black and white by pressing D on the keyboard. Click the "background" layer again and fill it with the foreground color ~ which is set to black. See the images below.

Step 4

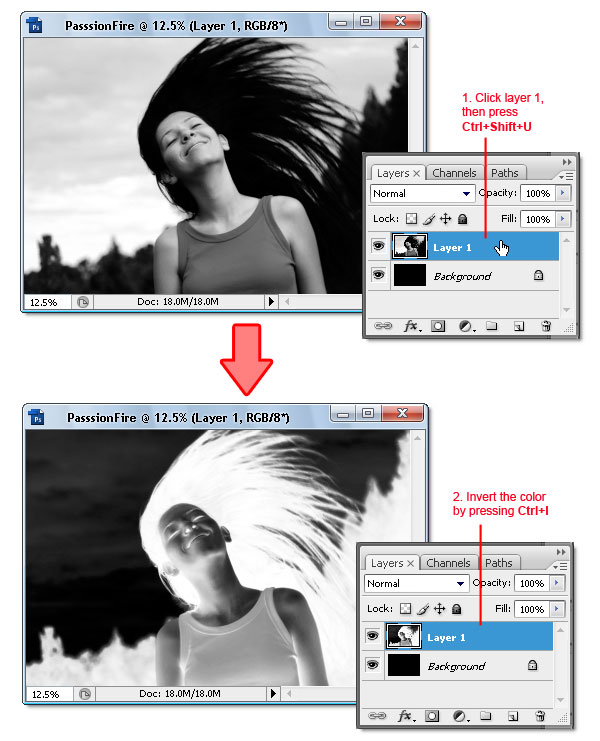
Reactivate "Layer 1," then press Command + Shift + U to apply desaturate command. Now invert the color by pressing Command + I. Your image should look like a film’s negative now.

Step 5

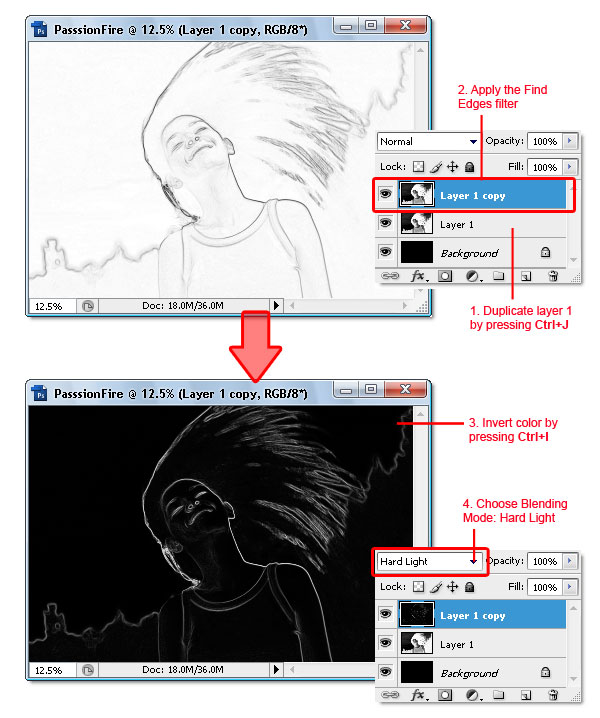
Duplicate "Layer 1," then apply the find edges filter from Filter > Stylized > Find Edges. Next, invert the color by pressing Command + I and change the Blending Mode to Hard light. There, your image now has contrast white line and a very dark background.
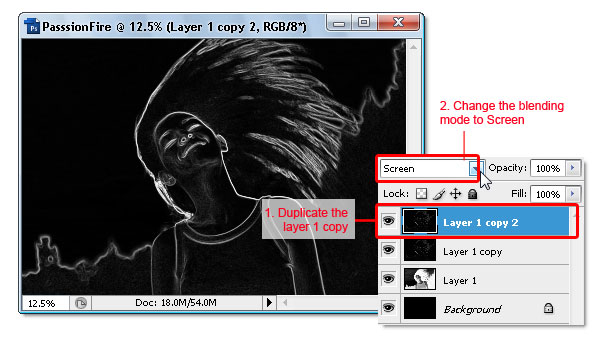
Step 6

To give the white line more contrast, duplicate the "Layer 1" copy then change the Blending Mode to Screen.
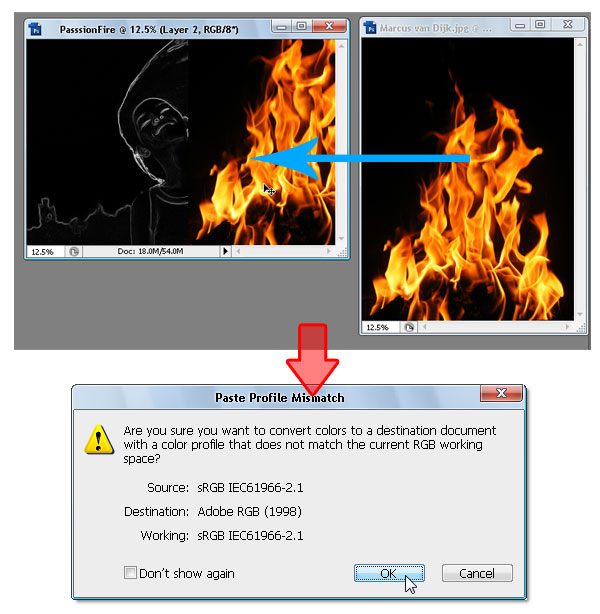
Step 7

Now we move to the second image. Drag image2 into "PassionFire" document image window using the Move tool. If the Paste profile mismatch dialog appears, just click OK to fix it.
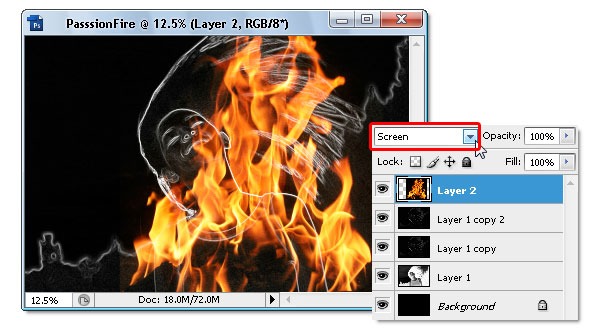
Step 8

The fire image from "image2" should be in "Layer 2" now. Change its Blending Mode to screen, this will hide all the black colors in "Layer 2." If done right, your image should be similar to the one below.
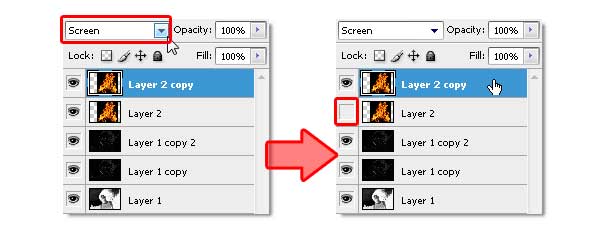
Step 9

Duplicate "Layer 2" by pressing Command + J. Make sure you use the Screen Blending mode, same as the original "Layer 2." Next, make "Layer 2" become invisible by hiding it from the layers panel.
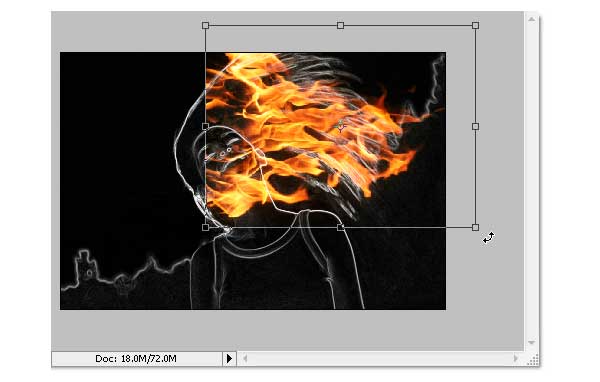
Step 10

Click the "Layer 2 copy" to make it active, then use the Free Transform command ( Edit > Free Transform) to rotate and resize the fire image like shown below. Don’t forget to press Enter when you’re done transforming.
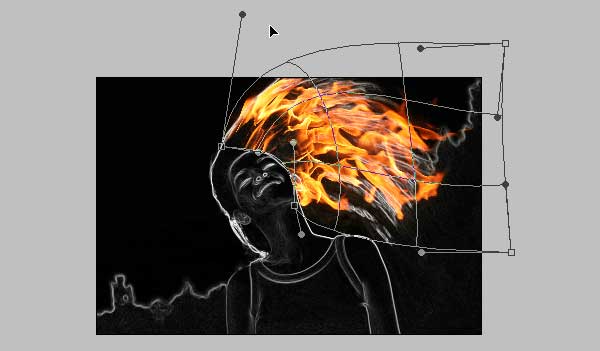
Step 11

Still in the same layer, now use the warp command (Edit > Transform > Warp) to bend the fire image – so it following the hair flow. Press Enter when done. See the example below as a reference.

Step 12

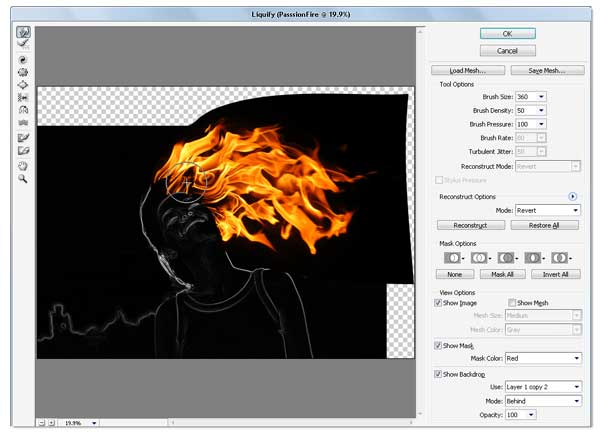
If you feel the result is not quite good enough, simply use the Liquify filter to fix it. I assume you already know how to use the liquify filter; the Forward Warp tool and Twirl Clockwise tool is the only tool I used to get this result (see image below).
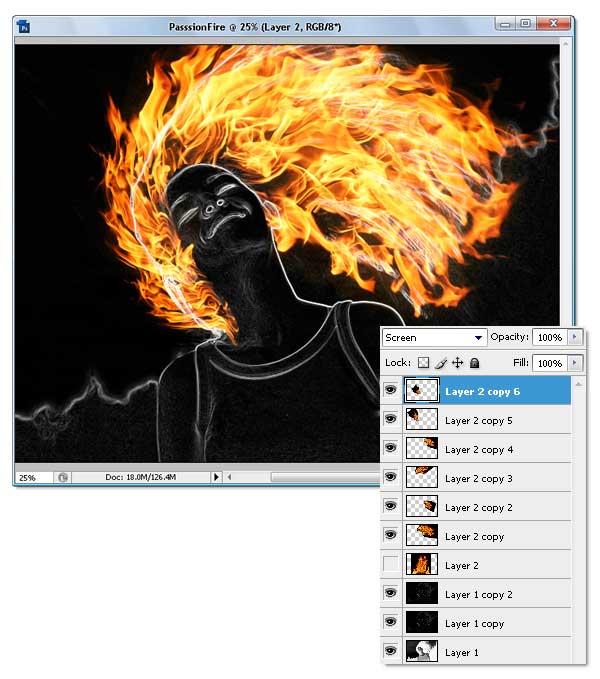

Step 14

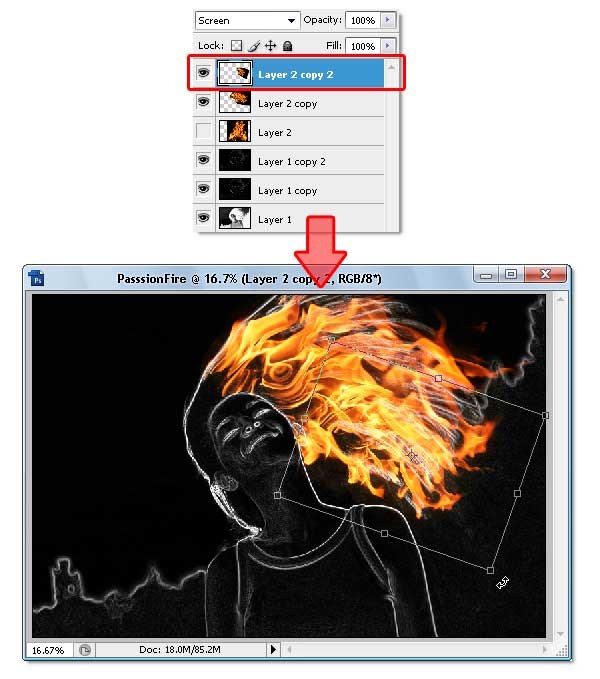
Repeat the previous process to get the hair covered with fire. Just duplicate and modify the layer until you get all the hair part covered. If needed, use the Liquify Filter again. The end result of this process should look like the image below, notice how many layers are used.

Step 15

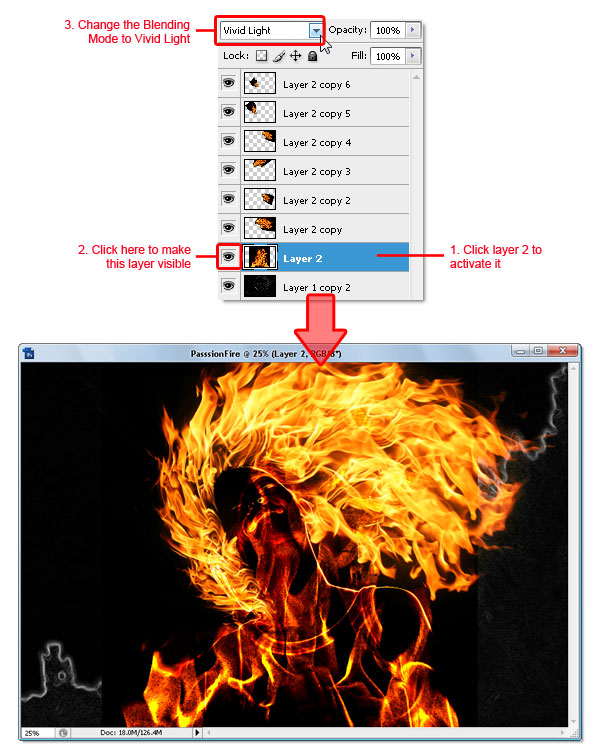
Okay, now activate "Layer 2" and make it visible again. Then Change the Blending Mode to Vivid Light. This step will colorize only the white line in the layer below it.

Step 16

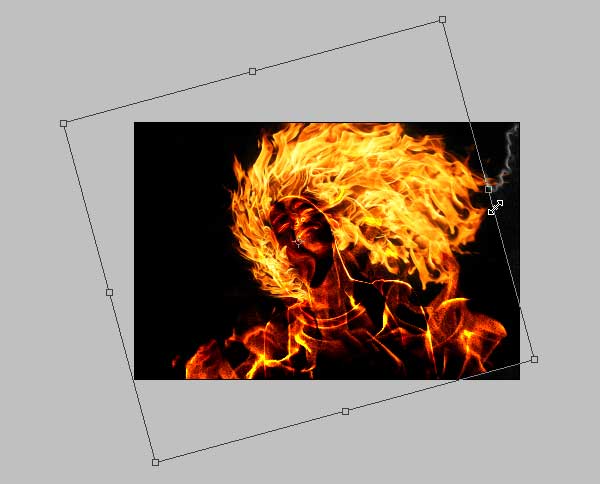
Still in "Layer 2," apply the Free Transform command to resize and rotate the fire image like shown below. The purpose is to cover up the girl’s body and hair with the fire texture. Press Enter when you’re done transforming.

Step 17

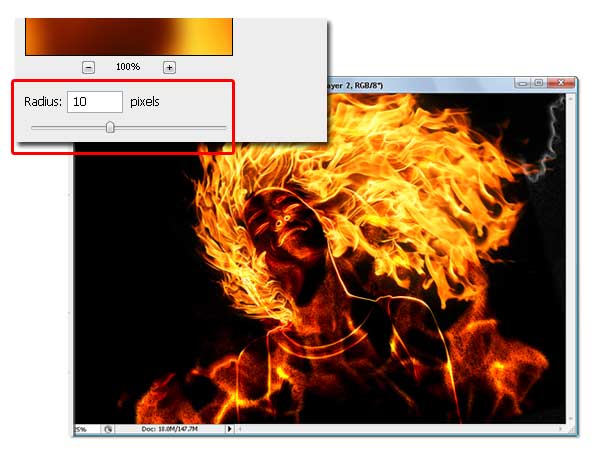
We’re gonna blur the fire image in "Layer 2," To do so, apply the Gaussian Blur filter from the Filter > Blur > Gaussian Blur menu. Fill the Radius around 10 to 15 pixels, then click OK when done. Blurring the fire image will cause its texture to blend smoother with the layer below it.

Step 18

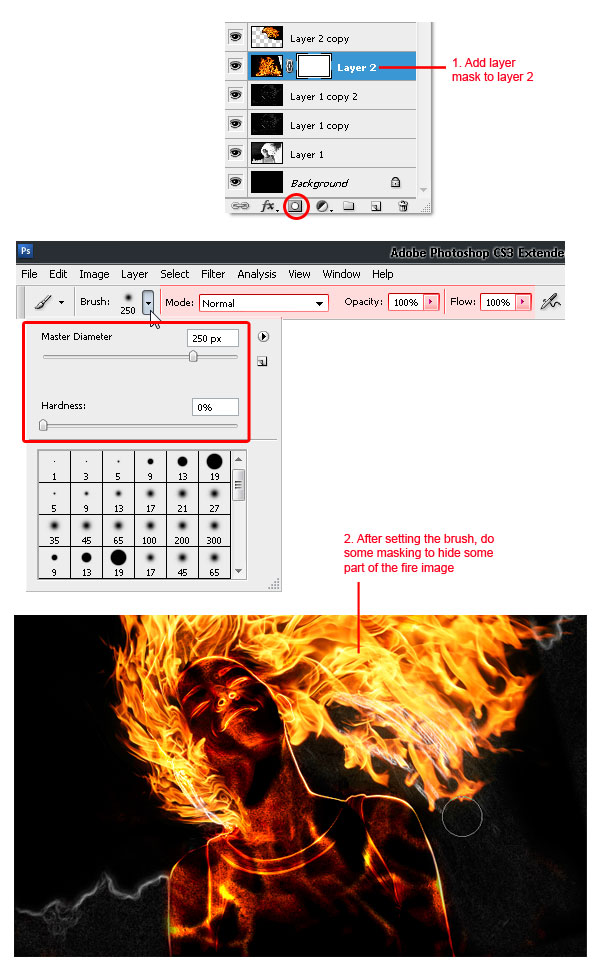
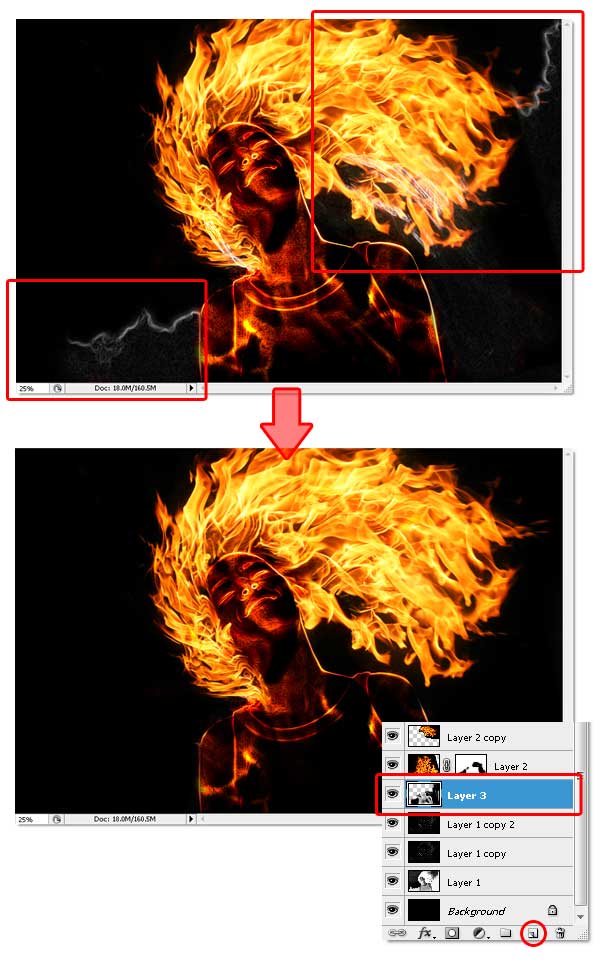
Now add a layer mask to "Layer 2." Then use a soft round Brush tool with Opacity at 100%. Set the brush size according to your need, then just mask until the fire outside becoming hidden. See the process below.

Step 19

Sure we will remove the white line shown in the image (marked in red rectangle below). First, add a new blank layer below "Layer 2." Then simply paint it with black using the soft round brush tool.

Step 20

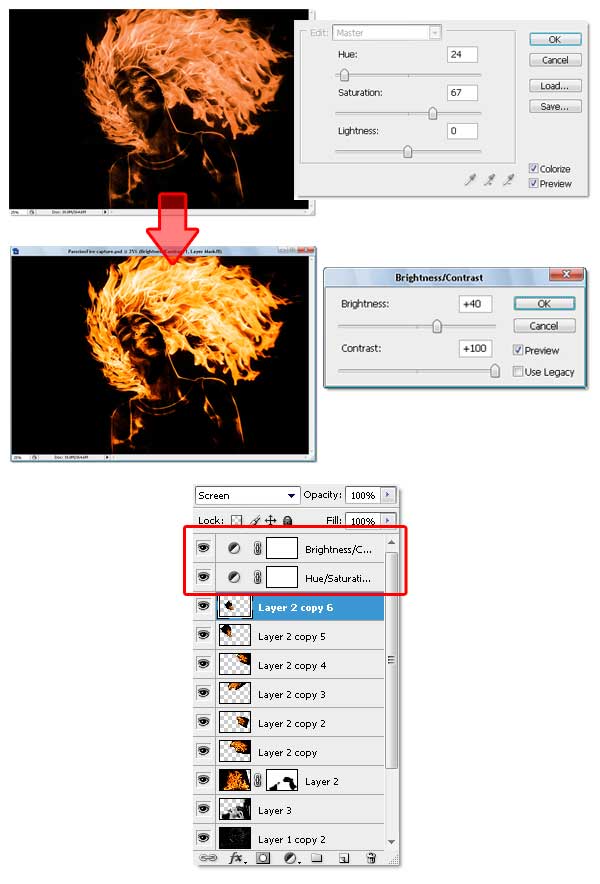
Now go to the top most layer (mine is: "Layer 2 copy 6"), add two adjustment layers which is Hue/Saturation and Brightness/Contrast. Careful not to change the layer adjustment order, or the color effect will be wrong. Below you can see the setting I used to complete this step, also pay attention to the adjustment layer order.
By adding a Hue/Saturation adjustment layer, we unify all colors. The Brightness/Contrast adjustment layer brings more color contrast and makes sure the image color’s looks like real fire.

Step 21

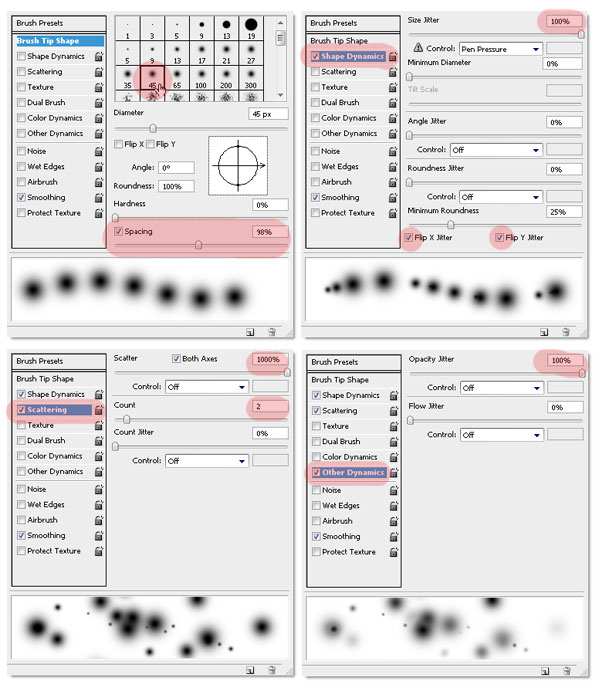
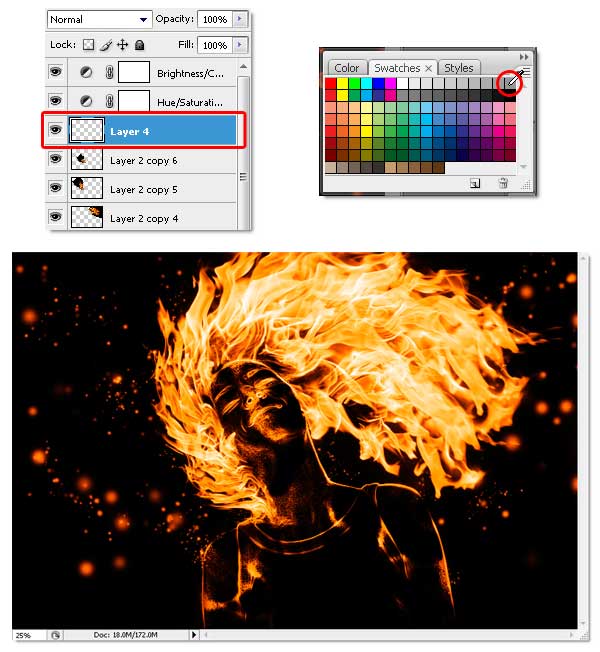
I’m sure you notice the fire sparks effect. I create it using the Brush tool with this simple setting. No special brush needed, but if you have one that will be useful then feel free to use it. Below you can see all the settings I used within the Brush palette, of course you can change the setting as you like. Just make sure the brush spatter enough and vary the size.

Step 22

Now to use the modified brush, create a new blank layer below the adjustment layers ( mine is named "Layer 4"). Choose 50% gray from the swatches palette, then you can start creating the fire sparks. Remember not to be monotone, resize the brush size if needed. I start using a big sized brush, then reduce it to smaller size (you can change brush size faster by pressing the bracket keys on the keyboard ).
If you’re not sure how to do this steps, just imagine where and how the fire sparks will flow if it was real fire. For me, imagining stuff is very helpful.

Step 23

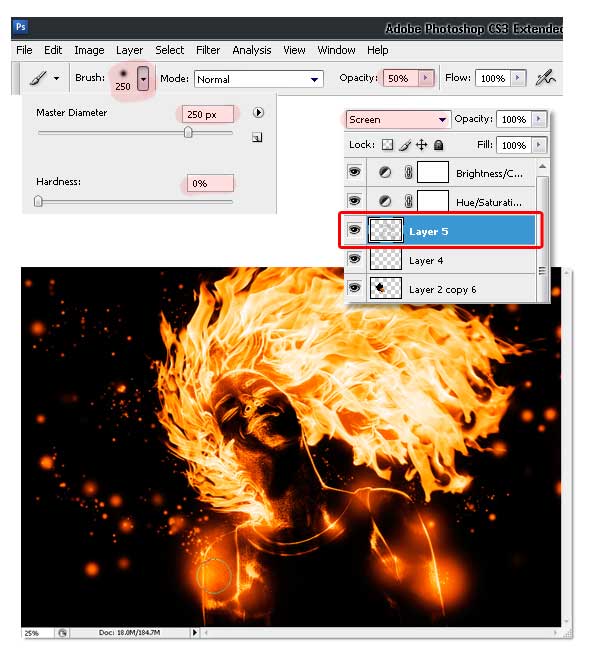
To make it more interesting, create a new layer and change the Blending Mode to Screen. Then use a normal soft round brush (not the one we modified earlier), with an Opacity of 50%. Just click in the part of body, neck, and hair. I’m not sure how to explain this, but you can see the difference between the above and below images.
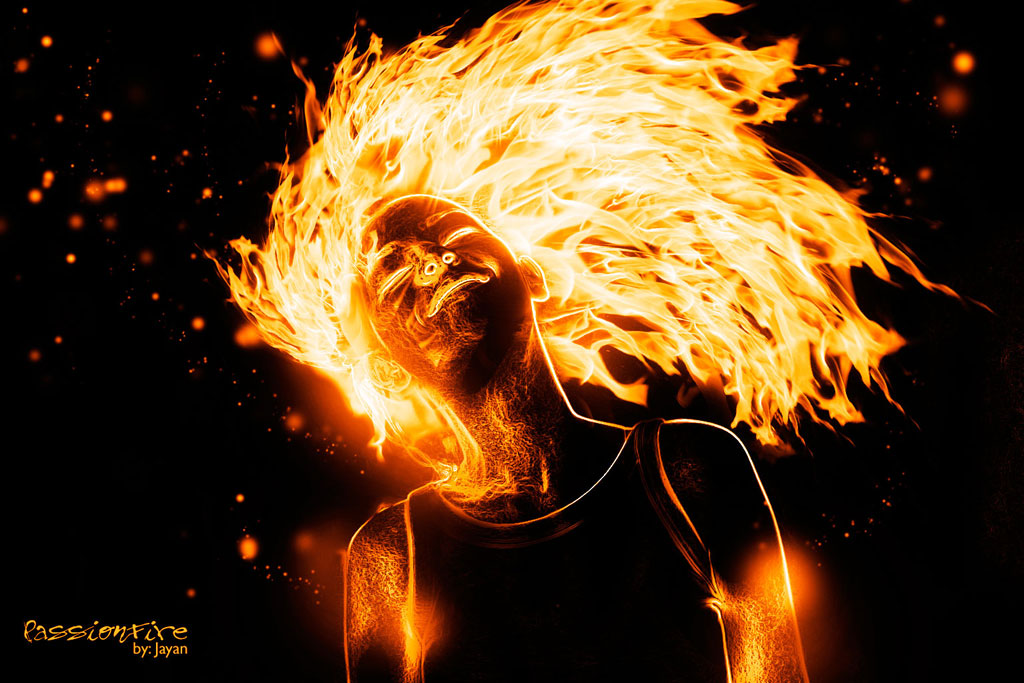
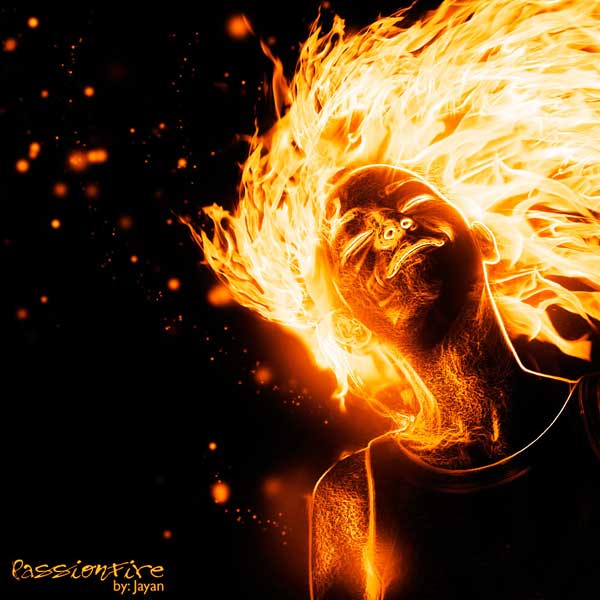
Conclusion

And that’s all of it! Hope you learned something new and had fun. You can view the final image below or view a larger version here.
m
read more

Belajar Asas Photoshop

Belajar Asas Photoshop


belajar-photoshop

Asas Photoshop


1. File
Berkaitan dengan file seperti menyimpan, membuka, export, import, dan cetak.

2. Edit
Menu editing secara umum seperti cut, copy, paste, transform image, serta untuk mengatur preferences
Adobe Photoshop.

3. Image
Berisi editing image untuk mengatur warna, hue/saturation, brightness/contrast, ukuran.

4. Layer
seperti menambah layer, menghapus, menambah efek pada layer, serta masking.

5. Select
Berkaitan dengan selection image.

6. Filter
Berhubungan dengan Photoshop yang dapat digunakan untuk memberi Efek tertentu pada image.

7. View
Digunakan untuk pengaturan view seperti zooming image, menampilkan skala, dan sebagainya.

8. Window
Digunakan untuk mengatur / menampilkan window

9. Help
Untuk menampilkan help dan tutorial Adobe Photoshop.

2. Tool Option Bar

Hampir semua tool pada Toolbox memiliki options, yang ditampilkan pada Tool Option bar. Options tersebut digunakan untuk mengatur nilai parameter atau option dari tool yang sedang aktif/dipilih. Sebagai contoh :

Setelah nilai parameter pada tool option bar diubah-ubah , (kita dapat mengembalikannya lagi menjadi nilai default (nilai semula) iaitu dengan memilih icon tool yang ada di sebelah kiri, kemudian klik tombol . Pada context menu yang muncul, pilih Reset Tool untuk mengembalikan nilai default dari tool yang sedang dipilih. Apabila ingin mengembalikan nilai default semua tools, pilih Reset All Tools.


A. SELECTION TOOL
•   Marquee Tool
Terdapat  4 jenis marquee tool
1. Rectangular Marquee (Shortcut keyboard: M, atau Shift + M)
Digunakan untuk membuat area selection berbentuk segi empat pada image.
2. Elliptical Marquee (Shortcut keyboard: M, atau Shift + M)
Digunakan untuk membuat area selection berbentuk elips atau lingkaran pada image.
3. Single Row Marquee
Digunakan untuk membuat area selection satu baris pada image (ukuran tinggi selection adalah 1 pixel)
4. Single Column Marquee
Digunakan untuk membuat area selection satu kolom pada image (ukuran lebar selection adalah 1 pixel).

•   A.2. Move Tool
Shortcut keyboard: V
Digunakan untuk menggeser/memindah selection, layers, dan guides.
•   A.3. Lasoo Tool

(Shortcut keyboard: L, atau Shift + L untuk mengubah jenis Lasoo) Terdiri dari 3 jenis yaitu:
1. Lasoo
Digunakan untuk membuat area selection dengan bentuk bebas
2. Polygonal Lasoo
Digunakan untuk membuat area selection berbentuk polygon
3. Magnetic Lasoo
Digunakan untuk membuat area selection dengan cara menempelkan
tepi selection pada area tertentu pada image.

•   A.4. Magic Wand Tool
Shortcut keyboard: W
Digunakan untuk membuat area selection yang memiliki warna serupa.Perbedaan toleransi warna dapat diatur pada tool option bar.


B. CROP & SLICE TOOL
•   B.1. Crop Tool
Shortcut keyboard: C
Digunakan untuk memangkas image (memotong dan membuang area tertentu dari image)

B.2. Slice Tool
(Shortcut keyboard: K, atau Shift + K untuk mengubah slice)
Terdiri dari 2 jenis yaitu:
1. Slice Tool
Digunakan untuk membuat potongan-potongan dari suatu image
2. Slice Select Tool
Digunakan untuk memilih potongan pada suatu image

C. RETOUCHING TOOL
•   C.1. Patch/Healing Brush Tool
(Shortcut keyboard: J, atau Shift + J mengubah tool)
1. Patch Tool
Digunakan untuk mengecat/melukis pada area tertentu image dengan pola (pattern) atau sample tertentu. Cocok untuk memberbaiki image yang rusak.
2. Healing Brush Tool
Digunakan untuk mengecat/melukis image dengan pola atau sample tertentu. Cocok untuk memperbaiki image yang agak rusak.

•   C.2. Stamp Tool
(Shortcut keyboard: S, atau Shift + S untuk mengubah tool) terdiri dari 2 jenis yaitu:
1. Clone Stamp Tool
Digunakan untuk melukis image dengan sample image tertentu
2. Pattern Stamp Tool
Digunakan untuk melukis image dengan menggunakan pola tertentu

•   C.3. Eraser Tool
(Shortcut keyboard: E, atau Shift + E untuk mengubah jenis eraser)
Terdiri dari 3 jenis yaitu:
1. Eraser
Digunakan untuk menghapus pixel image dan mengembalikannya ke state tertentu.
2. Background Eraser
Digunakan untuk menghapus area tertentu image menjadi transparan.
3. Magic Eraser
Digunakan untuk menghapus area tertentu image yang memiliki warna yang serupa menjadi transparan dengan satu kali klik.

•   C.4. Sharpen, Blur, Smudge Tool
(Shortcut keyboard: R, atau Shift + R)
1. Sharpen Tool
Digunakan untuk menajamkan area tertentu pada image.
2. Blur Tool
Digunakan untuk menghaluskan/mengaburkan area tertentu pada image.
3. Smudge Tool
Digunakan untuk menggosok/mencoreng area tertentu pada image

•   C.5. Dodge, Burn, Sponge Tool
(Shortcut keyboard: O, atau Shift + O)
1. Dodge Tool
Digunakan untuk menerangkan warna di area tertentu pada image
2. Burn Tool
Digunakan untuk menggelapkan warna di area tertentu pada image
3. Sponge Tool
Digunakan untuk mengubah saturation di area tertentu pada image.

D. PAINTING TOOL
•   D.1. Brush Tool
(Shortcut keyboard: B, atau Shift + B untuk mengubah tool) Terdiri dari 2 jenis yaitu:
1. Brush Tool
Digunakan untuk melukis image dengan goresan kuas
2. Pencil Tool
Digunakan untuk melukis image dengan goresan pencil

•   D.2. History Brush Tool
(Shortcut keyboard: Y, atau Shift + Y untuk mengubah jenis)
Terdiri dari 2 jenis yaitu:
1. History Brush Tool
Digunakan untuk melukis image menggunakan snapshot atau state history dari Image
2. Art History Tool
Digunakan untuk melukis image menggunakan snapshot atau state
history dari image, dengan model artistik tertentu.

•   D.3. Gradient, Paint Bucket Tool
(Shortcut keyboard: G, atau Shift + G)
1. Gradient Tool
Digunakan untuk mengecat area yang dipilih (selected area) dengan
perpaduan banyak warna.
2. Paint Bucket Tool
Digunakan untuk mengecat area yang dipilih dengan warna foreground
atau pola tertentu.

E. DRAWING AND TYPE TOOL
1.   E.1. Selection Tool
(Shortcut keyboard: A, atau Shift + A untuk mengubah jenis) Terdiri dari 2 jenis yaitu:
1. Path Selection Tool
Digunakan untuk melakukan selection path
2. Direct Selection Tool
Digunakan untuk mengubah anchor dan direction point dari path.

E.2. Type Tool
(Shortcut keyboard: T, atau Shift + T untuk mengubah jenis) Terdiri dari 4 jenis yaitu:
1. Horizontal Type Tool
Digunakan untuk membuat tulisan secara horizontal
2. Vertical Type Tool
Digunakan untuk membuat tulisan secara vertikal
3. Horizontal Type Mask Tool
Digunakan untuk membuat selection berbentuk tulisan secara horizontal
4. Vertical Type Mask Tool
Digunakan untuk membuat selection berbentuk tulisan secara vertikal

2.   E.3. Pen Tool
1. Pen Tool
(Shortcut keyboard: P, atau Shift + P)
Digunakan untuk membuat path dengan lengkung-lengkung yang halus
2. Freeform Pen Tool
(Shortcut keyboard: P, atau Shift + P)
Digunakan untuk membuat path berbentuk bebas (sesuka kita )
3. Add Anchor Point Tool
Digunakan untuk menambah anchor point atau titik editor pada path
4. Delete Anchor Point Tool
Digunakan untuk menghapus anchor point tertentu pada path
5. Convert Point Tool
Digunakan untuk mengubah anchor dan direction point tertentu pada path

•   E.4. Shape Tool
(Shortcut keyboard: U, atau Shift + U untuk mengubah jenis)
1. Rectangle Tool
Digunakan untuk menggambar bentuk segi empat
2. Rounded Rectangle Tool
Digunakan untuk menggambar segi empat melengkung
3. Ellipse Tool
Digunakan untuk menggambar ellipse
4. Polygon Tool
Digunakan untuk menggambar polygon
5. Line Tool
Digunakan untuk menggambar garis lurus
6. Custom Shape Tool
Digunakan untuk menggambar bentuk tertentu dari daftar bentuk yang ada

F. ANNOTATION, MEASURING & NAVIGATION TOOL
•   F.1. Notes Tool
(Shortcut keyboard: N, atau Shift + N untuk mengubah jenis)
1. Notes Tool
Digunakan untuk membuat catatan pada image seperti copyright.
2. Audio AnnotationTool
Digunakan untuk membuat suara/audio pada image
•   F.2. Eyedropper, Measure Tool
(Shortcut keyboard: I, atau Shift + I)
1. Eyedropper Tool
Digunakan untuk mengambil sample warna pada image untuk warna
foreground
2. Color Sampler Tool
Digunakan untuk mengambil berbagai sample warna pada image
3. Measure Tool
Digunakan untuk mengukur jarak atau sudut pada image

•   F.3. Hand Tool
Shortcut keyboard: H
Digunakan untuk menggeser/memindah bidang pandang image di dalam window view area.

•   F.4. Zoom Tool
Shortcut keyboard: Z
Digunakan untuk memperbesar atau memperkecil tampilan image.

•   F.5. Background and foreground color
Supaya default tekan tombol D maka warna foreground dan background menjadi putih dan hitam. Untuk menukar warna background dan foreground tekan tombol X.

•   F.6. Normal and Quickmask Mode
Normal Mode : Semua fungsi seperti brush akan berjalan seperti biasanya. Quickmask Mode : fungsi brush bisa dipakai untuk seleksi cuman jika setelah proses quickmask maka yang diseleksi malah dibagian luar nya.

•   F.7. Screen Mode
Untuk melihat tampilan area kerja windows.

1. FILL
Edit > fill
Berfungsi untuk menukar warna keseluruhan kalau tidak. Warna boleh diatur didalam windows option.

2. STROKE
Edit > stroke
Berfungsi untuk mewarnai garisan. Ketebalan dan di dalam window option.

3. TRANSFORM
Edit > Transform
Tool ini untuk mentransformasi gambar di dalam layer tertentu.
Scale : untuk merubah besar kecilnya suatu gambar
Rotate : untuk memutar gambar
Skew, distorsi, perspektif, warp : untuk merubah bentuk gambar sesuai keinginan kita.
Rotate 180 : untuk memutar gambar sebesar 180 derajat.
Rotate 90 CW : untuk memutar gambar sebesar 90 derajat searah jarum jam
Rotate 90 CCW : untuk memutar gambar sebesar 90 derajat berlawanan arah jarum jam.
Flip horizontal : untuk memirror gambar kearah Horizontal
Flip Vertikal : untuk memirror gambar kearah Vertikal.

4. MODE
Image > Mode
Untuk merubah system pewarnaan, diantaranya :
- RGB : Red, Green, Blue
- CMYK : Cyan Magenta Yellow Black
- Grayscale : untuk warna Hitam Putih.

5. ADJUSTMENT
Image > adjustment
Untuk menentukan terang gelapnya gambar ( Brightness/Contrast.( Hue/Saturation )
6. IMAGE SIZE
Image > image size
Untuk merubah besar kecilnya suatu gambar.

7. CANVAS SIZE
Image > canvas size
Untuk merubah besar kecilnya background. Dan ini akan membuat gambar di layer menjadi terpotong.

8. ROTATE CANVAS
Image > Rotate Canvas
Untuk memutar background beserta gambar yang ada didalam area gambar.

9. INVERSE
Select > inverse
Tool ini berfungsi hanya jika ada image atau layer yang terseleksi.

10. FEATHER
Select > feather
Untuk memperhalus atau membuat blur suatu gambar. Ini biasanya digunakan pada saat pemisahan suatu objek gambar dengan background nya.

11. EFFECT
Tool untuk membuat effect ini ada semua di dalam toolbar filter.

12. RULER
View > ruler
Untuk menampilkan ukuran di area gambar. Ukuran bisa disetting dengan cara klik kanan di ruler area gambar maka akan muncul satuan ukuran yang akan digunakan. Seperti pixel, cm , inches, dll.
Kalau kita drag ruler ke dalam area gambar maka akan muncul suatu garis bantu berwarna biru terang. Dan garis bantu ini tidak akan tercetak kalau kita print.

13. SNAP
View > snap
untuk meletakkan gambar kemana saja kita suka.

read more
Related Posts Plugin for WordPress, Blogger...

Berita Sensasi

Receive All Free Updates Via Facebook.